This recipe was submitted by one of our readers, just like you.
Festive Strawberry Dipped Christmas Tree Recipe
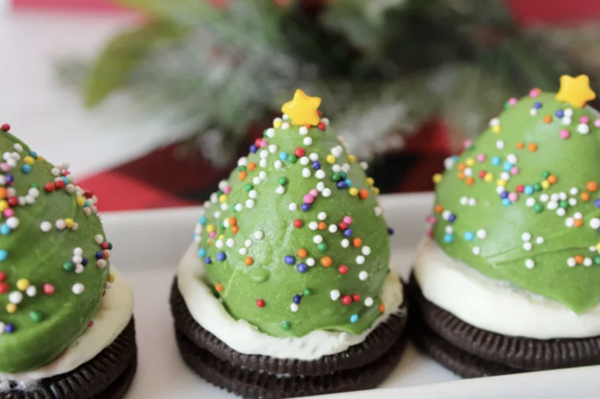
From the blogger: "Chocolate dipped strawberries are such a refreshing treat! Just an Oreo cookie and Christmas spirit and you’ll get these amazing strawberry dipped Christmas trees to enjoy during the holidays. The perfect combination of chocolatey and fruity goodness!"
Ingredients
- 12 oz. Green Candy Melts
- 1 lb. strawberries (remove the tops)
- 24 sandwich cookies (I used oreo cookies)
- White icing
- Sprinkles
- Candy stars
-
Start by making the Oreo base. Pipe vanilla icing onto the top of each sandwich cookie. This creates a snow effect for the trees and allows the strawberry to stick. Try our homemade vanilla buttercream frosting for added richness!
-
Remove stems off strawberries using a knife and slice each end to create a flat surface.
-
In a microwave safe bowl, slowly melt the candy melts, stirring occasionally.
-
Once chocolate is fully melted, use a small fork to dip the strawberries with the fork inserted into the cut, flat end.
-
Using a second fork, remove the strawberry and slowly set on top of the iced Oreo.
-
Top with sprinkles and a candy star. Be sure to work quickly as the sprinkles will stick better while the chocolate is wet. Allow chocolate to fully cure and enjoy!
Tips and Tricks
1. How do I make sure the chocolate sticks to the strawberry?
After you wash your strawberries, be sure to dry them super well! The drier they are the better the chocolate is going to stick to the strawberries. No one wants a half coated chocolate strawberry! This is where paper towels really come in handy!
2. How do I keep my melted chocolate from getting clumpy?
Have you ever had this problem? You’re coating your strawberries in chocolate and things are going great until all of a sudden the chocolate starts to get clumpy and now you’ve got lumpy, not so pretty, chocolate dipped strawberries? Yeah, me too! Here’s the secret to perfectly smooth, runny chocolate for your decorating adventure. Just add a little bit of fat (butter, oil, shortening, coconut oil, etc) to your chocolate when it’s warm.
Add in very small increments until the desired texture is reached. Remember that you can always add more, but you can’t take away what’s already been added. Go slow and steady.
3. How do I keep from burning my melting chocolate?
The trick here is to stop microwaving your melting chocolate when you can see a few unmelted lumps in the chocolate. Just keep stirring and you’ll soon be looking at perfectly not burnt melted chocolate.
Another trick I’ve learned over the years is to actually follow the melting instructions over the years! I know that seems silly, and everyone already knows that, but I could have used that advice a time or two. 10 seconds in the microwave can make a difference!
To keep from burning the chocolate, stop microwaving when there are only a few lumps left and just continue to stir the chocolate until it’s all smooth.

Read Next4th of July Ice Cream Cone Cupcakes