This recipe was submitted by one of our readers, just like you.
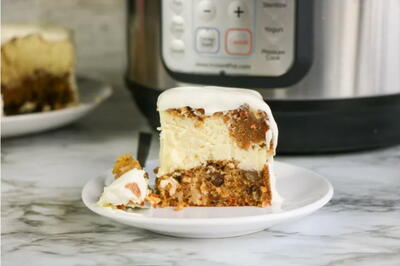
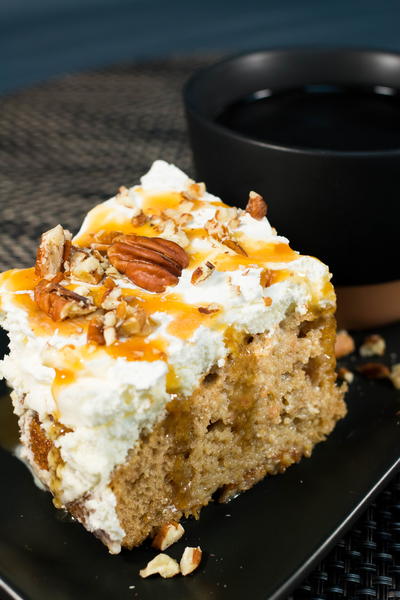
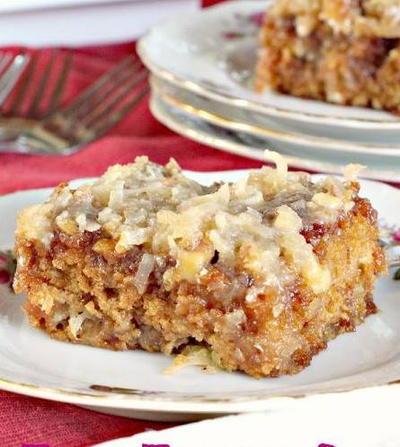
Rich And Creamy Instant Pot Carrot Cake Cheesecake Recipe

Rich And Creamy Instant Pot Carrot Cake Cheesecake Recipe
"With the perfect mix of cream and spice, this instant pot carrot cake cheesecake will make your taste buds happy. While cheesecake can be tricky, this mix of carrot cake and cheesecake makes this cake much easier to work with. Plus side, making this cake in your instant pot means you won't need to heat up your house with the oven. Just keep in mind that you do need a springform pan that will fit in your instant pot to make this recipe. It's worth it to take a bit of this rich, deep carrot cake cheesecake!"
Makes1 cake
Cooking MethodPressure Cooker
Ingredients
- 1 cup all purpose flour
- ½ tsp baking soda
- 1 tsp ground cinnamon
- ¼ tsp nutmeg
- ¼ tsp salt
- ¾ cup vegetable oil
- ¼ cup brown sugar
- ½ cup sugar
- 2 eggs
- 1 tsp vanilla extract
- ⅔ cup finely shredded carrots
- ½ cup crushed pineapple, well drained
- ¼ cup shredded coconut
- ¼ cup chopped pecans
- 2 (8 ounce) packages cream cheese, room temperature
- ½ cup sugar
- 2 Tbsp flour
- 2 eggs, room temperature
- ½ cup sour cream
- 1 tsp vanilla
- 2 cups sour cream
- ¼ cup sugar
- 1 tsp vanilla
-
Apply cooking spray to a 7 inch springform pan.
-
In a medium bowl, whisk together the dry cake ingredients: flour, baking soda, cinnamon, nutmeg, and salt.
-
In a mixing bowl, beat the oil, brown sugar, and sugar. Scrape down the sides and then add the eggs and vanilla, blending until well mixed.
-
Fold in the carrots, pineapple, coconut, and pecans.
-
Set aside about 1/4 cup of the batter. Pour the remaining batter into the springform pan.
-
In a mixing bowl, beat the cream cheese for 5 minutes or until completely smooth. Add the sugar and flour, beating until combined. Scrape down the sides and add the eggs, one at a time, and mix just until blended.
-
To the cream cheese mixture, add the sour cream and vanilla, beating until combined.
-
Spoon the cream cheese batter into the springform pan over the cake.
-
Dot the remaining cake mixture on the top and run a knife around the top two or three times to swirl slightly. Do not stick the knife all the way into the cake. You only want to swirl the cheesecake layer.
-
Cover the springform pan with aluminum foil that has been spritzed on the underside with nonstick cooking spray.
-
Place the trivet into the electric pressure cooker along with the manufacturer’s recommended water serving, typically 1 cup to 1 ½ cup.
-
Using a sling created from aluminum foil (if the trivet does not have handles,) lower the cheesecake into the electric pressure cooker.
-
Cover the pressure cooker and set the valve to sealing. Program the electric pressure cooker using “manual” or “pressure cook” for 45 minutes. Allow the pressure cooker to naturally release the pressure completely before removing the lid.
-
Carefully lift the cheesecake from the electric pressure cooker using the sling. Allow the cheesecake to come to room temperature before storing in the refrigerator overnight.
-
Run a knife around the edge of the springform pan before releasing it.
-
If desired, mix together the sour cream, sugar, and vanilla until the sugar has melted. Spoon over the cheesecake and allow it to run down the sides.
-
Refrigerate until ready to serve.
-
Tip 1: Make sure your ingredients are at room temperature before you start. Otherwise your cheesecake won’t set up right.
-
Tip 2: Refrigerate your cheesecake for at least 6 hours before serving. This will allow the cake to cool completely and to have the best flavor it possibly can before serving. Making it the day before has worked well for me in the past!
-
Tip 3: I’ve found that tapping the pan on the counter a couple times before baking helps to release the trapped bubbles making a better, more dense cake.
-
Tip 4: Feel free to add things like raisins or pecans to this recipe.

Read NextMillionaire’s Cake